
Developing a Database Application:
The dBASE Plus Tutorial
Ken Mayer, Senior SQA Engineer, dBASE Inc.
Michael Nuwer, dBASE user
|
Developing a Database Application:
|
|
Creating The Database |
The goals of phase II of this tutorial are:
The first thing you will need to do in your project is to create some tables. A collection of tables is a database. The term database is an old one, although early dBASE/DOS manuals confused a lot of developers by calling individual tables "database files" (hence the extension .DBF), and a lot of folk still call individual tables (.DBF files) "databases". Don't let that confuse you -- a database is really a group of tables.
In a SQL Server database (Interbase, Oracle, or whatever) this collection of tables might actually be stored in a single file. However, we will be using local tables, and these are all individual files -- as a matter of fact, a local .DBF typically uses at least two files (a .DBF and a .MDX) and may have a third file if you are using memos or other Binary fields (.DBT).
For our project, we are working in the "dBASEtutorial" directory, but we really don't want to keep all the tables in the directory with the source code. Instead, we will store them in a directory under the "dBASEtutorial" directory. In the Tutorial installation, a folder called Tables was created. As we create our tables we will make sure that they are saved in this folder, which will be our "database".
The preferred way to access a database is with a database alias. Thus the first thing we need to do for this phase of the tutorial is to create a database alias, which is how we will tell dBASE Plus to treat the tables in the Tables folder as a database.
This sounds like it should be complicated, but it's really not.
If dQuery is not already open, open it now by selecting File from the menu, then select dQuery.
On the dQuery toolbar, click the "New Database object" button (you can move the mouse over the buttons to read the tooltips). The Database Connection dialog form will appear.
From this dialog you can add an existing database alias to the current design surface, or you can create a new alias. We are going to create a new one, so click the "Create New Connection" button. The Easy Alias dialog form will open and you must enter two pieces of information. First enter "dBASEtutorial" as the connection name. Below this entryfield is a "Notebook" control with multiple tabs. These tabs represent the type of database you want the alias to connect. For the tutorial we are using dBASE tables, so select the dBASE tab and enter "C:\dBASEtutorial\Tables" (or whatever you used for your local path). Click "OK".
This should return you to the Database Connection dialog form. Locate the connection name that you just created, dBASETutorial, in the connection list and click "OK". You have just created a database alias, and now you can use this to reference your tables.
There is a programmatic method of creating (or deleting) a database alias, contained in the dBASE Users' Function Library Project (dUFLP) also in the Knowledgebase, in the file "BDEALIAS.CC". We are not using that in the tutorial application, but you may want to consider using this in the future.
For our application we need several tables. As we go we will attempt to explain the whys and wherefores of the different information we will be storing into these tables.
Note: It is very important to note that if you are using the Japanese (or whatever Oriental) version of dBASE Plus, that the program used at the end of this part of the tutorial to obtain the data will not work unless you change the names of the fields in the tables created here to the appropriate language (you can look at the table structures of the data tables already in the database folder) -- i.e., change the name of each field shown here to Japanese if you are using the Japanese version of dBASE Plus, or modify the fields in the data tables so that the fieldnames are in English.One other option is, after you have created the tables as described here, when you get to the CopyData routine (close to the end of this section of the tutorial), copy the tables from the "Working" version of the dBASE Plus Tutorial application (found in \dBASEtutorial\Final). If you complete the exercise in creating the tables and indexes, you will have learned what you needed to for this part of the tutorial, and copying the tables from the working version will not harm anything you do.
(This information provided by Alfredo Segovia)
Note: It is quite important for the tutorial application to work properly that you set the fields as described and do not vary in what we are doing, even if you are getting impatient and want to try to build your own application instead. If you do not do things the way the tutorial shows you to, then somewhere along the line something in the tutorial project will not work the way it should and you will get all upset about it ... trust us. We've seen it way too often (and done it ourselves).
Creating The Customer Table
Information about the customers is obviously going to be very important for
any sales organization. The information could be very complex, although this
particular application will not be too detailed.
At the very least you need to know customer names, an address for billing and shipping (we are going to assume that they are the same, although you might, in a real-world application need two or more addresses), a comment field, and a unique identifier. The reason for this last is that it is quite possible to have two customers with the exact same name. How do you tell them apart? You do it in your application with a unique identifier, which we will call simply "Customer ID".
Creating a table in dBASE Plus is rather easy. In the dQuery menu click "Tables," then "Create Table...." The Create Table dialog will open. In the "File name:" entryfield type the name of the table, which will be "Customer.dbf".
We want to save this table in the "dBASETutorial" database. This database should be selected in the database combobox at the bottom of the form. You may note in the dialog that the "Save in" combobox at the top of the form is pointing to the working folder, not the database folder. This combobox is disabled and has no effect on the present operation. A bit confusing to say the least.
Now click the save button and the new table will be created.
You are now in the table designer. You may notice that the menus and toolbar (the buttons at the top of the screen) have changed. You will also see a floating component called the Inspector -- get used to this -- you will see it a lot in dBASE Plus. The inspector is used to "Inspect" and in many cases, changes properties, events and methods of various objects.

We are going to work with the first three columns to define the fields of the table (the fields are where the data is actually stored in a table) -- we'll come back to the last column later. We are not using numeric values other than autoincrement and long integer fields for this application, so we will not worry about the decimal column.
The first field is going to be the "Customer ID" field. This, as you will recall, needs to be a unique identifier. How do we do that? In older versions of dBASE you had to write a bunch of code to make a field a unique identifier. dBASE 7 tables, however, have a special field type: autoincrement. This field type can handle numeric values up to over 2 billion, but more importantly, each time you add a new row to the table this field is automatically filled in, and the value is one more than the previous row. It means that you can never duplicate the value in this field. The other fields in this table are going to be more standard (most of them are character, the last is a memo).
Note: This tutorial assumes creation of tables from scratch -- if you modify a table and add an autoincrement field, or change a field TO an autoincrement field, you may get some odd results. If you decide you must have an autoincrement field on an existing table, you are better off creating a NEW table with the same field names and types, add the autoincrement field, and then append the old data to the new table -- this will ensure that each row has a number in the autoincrement field (and that it is a unique value), and so on. If you have an application where you already have valid links (parent/child or master/detail rowsets), you may be better off leaving it "as is" ... use whatever method you already have to create the primary key for linking the tables, incrementing the key value, etc.
In the table design surface, in the "Field Name" column, enter "Customer ID" (without the quotes), and press the <Tab> key on your keyboard. This will place you on the "Type" column. Select "Autoincrement" in the combobox (the drop down list) or type the letter "A" (which will also select the autoincrement field type), and notice that the "length" column is set to 4.
Note:"4? But you said that this field can handle 2 billion ... four digits is not enough!" Yes, I know ... what this is saying is that four BYTES are reserved and four BYTES means a lot more room than four "digits". The actual value here is a LONG Integer, which allows a range of approx. 4 billion characters (256^4 = 4,294,967,296 characters), but half of those are negative -- the autoincrement field doesn't do negative numbers.
We are not going to tinker with the "Dec" and "Index" fields at the moment (we'll deal with indexes later in the tutorial), so tab past those. This will place you in "Field 2", in the "Field Name" column again. Set the table to the following information:
Field Field Name Type Width 1 Customer ID AUTOINCREMENT 4 2 Last Name CHARACTER 20 3 First Name CHARACTER 20 4 Phone CHARACTER 20 5 Street1 CHARACTER 40 6 Street2 CHARACTER 40 7 City CHARACTER 30 8 State ID CHARACTER 2 9 Postal CHARACTER 10 10 Country ID CHARACTER 2 11 Comment MEMO 10
Note: A lot of books or tutorials would have you create the indexes here. We're not going to deal with indexes just yet. This is only for teaching purposes -- we will be covering indexes in some detail later, and it's easier to just teach things in sequence. While developing a "real" application you probably would just create the indexes for each table as you create the table.
Save the table by pressing <Ctrl> and "W" at the same time or click the save button on the toolbar and close the table designer.
As we go some of these fields will (hopefully) start to make sense. For example, the "State ID" and "Country ID" fields will be used to perform lookups in other tables that we will be creating for this application.
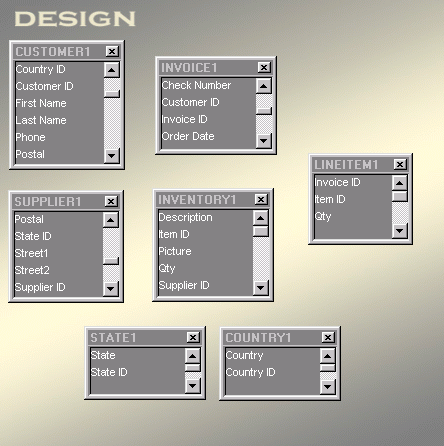
The following diagram is a representation of the database that we are creating for the Tutorial. The Customer, Invoice, and Lineitem tables store invoicing data while the Supplier, Inventory, and Lineitem tables store inventory data. The State and Country tables are lookup tables.
Creating the Supplier Table
The next table needed for this application is Supplier (the folk the inventory
comes from). This table is very similar to the Customer table. We need to know
the name of the contact person in the company, as well how to contact them (email,
phone, etc.). Let's create the new table in the same way we did before, choose
"Table," then "Create Table..." from the dQuery menu. Call
this table "Supplier," then add the following fields:
Field Field Name Type Width 1 Supplier ID AUTOINCREMENT 4 2 Contact CHARACTER 30 3 Company CHARACTER 40 4 Phone CHARACTER 20 5 Fax CHARACTER 20 6 CHARACTER 40 7 Street1 CHARACTER 40 8 Street2 CHARACTER 40 9 City CHARACTER 30 10 State ID CHARACTER 2 11 Postal CHARACTER 10 12 Country ID CHARACTER 2
Save the table.
Creating the Inventory Table
The inventory table will not be very large, but this is because of
the design. We are storing some information that might be stored here in
another table. The reason for this is that some of that information is
redundant -- for example, information about suppliers should not be stored
in the inventory table -- you are likely to get a variety of merchandise
from the same supplier. Storing that information for each item that comes
from the same supplier is a bad idea -- if the supplier data changes, you
have to change it in each inventory item that comes from that supplier.
Note: The process of breaking data out into smaller tables like this is called normalization. It can save you (the developer) and/or the client a lot of effort later on, and can also save disk space because you are not saving a lot of copies of the same information. There are books that delve deeply into normalization -- suffice it to say that if you have a lot of data that is being replicated you should probably normalize the data by breaking it into smaller tables. While this may mean a lot of work to get started it will save both you and your clients a TON of work later on.
In order to link the tables (Inventory and Supplier, for example), we will use a field ("Supplier ID") that matches the same type as the unique identifier ("Supplier ID" in the Suppliers table). This field will be an autoincrement field. However, we don't want to use an autoincrement field in the Inventory table for the "Supplier ID", instead, we want a "Long" (short for "Long Integer") which is the same type as "Autoincrement" but does not increment the value when a new row is added. The "Supplier ID" field in the Inventory table will be a link to the matching "Supplier ID" in the Supplier table.
Create the table now, name it "Inventory," and Fill in the following information:
Field Field Name Type Width 1 Item ID AUTOINCREMENT 4 2 Supplier ID LONG 4 3 Description CHARACTER 40 4 Qty LONG 4 5 Picture BINARY 10
Note that each item has a unique id ("Item ID"), a link to the supplier, a description, the quantity on hand, and a binary field used to store a picture of the item.
Save the table as before.
Creating the Invoice Table
Each Invoice can have multiple items on it, and will need to have a way to link
to the customer as well, otherwise we will not know who ordered the items for
the invoice. When we get to a later part of the project, we will see how to
set up a relationship like this. One very useful feature of this is that if
the relationship is set properly, adding a new row will automatically fill in
the linking field ... we will get to that when we look at forms.
The Invoice ID field will be used to link "line items" to the invoice. The Customer ID field will be used to link the customer data to each invoice. When we get to designing the forms you will see the way we are using the "Pay Type" field (we will be doing a form of "field morphing") and so on ... it's rather spiffy, but a bit complicated to discuss here.
In the meantime, we need to create the table, call it "Invoice," and set it up along these lines:
Field Field Name Type Width 1 Invoice ID AUTOINCREMENT 4 2 Customer ID LONG 4 3 Order Date DATE 8 4 Pay Type CHARACTER 2 5 Card Number CHARACTER 20 6 Card Exp CHARACTER 10 7 Card Name CHARACTER 40 8 Check Number LONG 4
Save the table.
Creating the Line Item Table
The line item table will be used to store information about each item
ordered. The interesting thing is that two of the three fields will actually
be references to other tables.
The first field, "Invoice ID", is a link to the Invoice table. The second, "Item ID" is a link to the Inventory table -- we will be displaying the name (description) of the item. The "Qty" field is the quantity ordered.
Create a table as before (call it "LineItem"), and create the following fields:
Field Field Name Type Width 1 Invoice ID LONG 4 2 Item ID LONG 4 3 Qty LONG 4
Save this one.
Creating the State Table
The State table is going to simply be used for a lookup. The Customer and Supplier
tables will store a reference to the state (standard two character state
ids, such as "CA" stands for "California"). However, for the users' convenience
the screen will actually show the full name of the state. This will be done
by setting a special lookup instruction for these tables in the datamodules.
To do this we need a very simple table that looks like:
Field Field Name Type Width 1 State ID CHARACTER 2 2 State CHARACTER 32
Call this table "State."
Creating the Country Table
This table is designed nearly identically to the State table above
because it is being used in the same way. Create a new table and set the
following information:
Field Field Name Type Width 1 Country ID CHARACTER 2 2 Country CHARACTER 20
Call it "Country."
Now we have a bunch of empty tables, however, once we start using these tables we are going to need ways of displaying the data in sequences other than the "natural order" (the sequence the data was entered by the client).
To that end, we will need indexes.
There are several ways to add indexes to your dBASE tables. We are going to take a look at a couple of them.
Note: For the tutorial we will be creating index tags that we won't use for the tutorial project. These may be useful however for other reports and such. It is sometimes a good idea to think ahead. You can always remove an index tag if you decide you are not going to use it in your application (this can be done in several ways, including in the "Manage Indexes" dialog we will be using shown below).
The first method of creating an index (and the one we will be using the most in the tutorial) is in the designer.
An index is a way to store information contained in the table in a specific sequence, which can be used to order the data (for example, as the user is scrolling through the data in a form trying to find a particular customer or invoice or to order a report in a specific sequence). dBASE has used, since dBASE IV version 1.0, what are called production indexes -- these are a set of index expressions stored in a single file (.MDX). The individual indexes are called "tags" or "index tags".
Note: You can create indexes on single fields, and you can create complex or expression indexes -- these are based on calculations, often just adding two fields together (such as "lastname" and "firstname") for the purposes of a search or a report. You can include the same field in multiple index tags. Also note that while in earlier versions of dBASE, you could use user-defined functions in the index expression, this ability was removed when Visual dBASE 7 was introduced (no other database software does this, and the BDE no longer supports it -- this was a decision by the BDE developers, not the Visual dBASE team). Hence, dBASE Plus does not support UDF in the index expression.
The big advantage index tags have over the older method of storing each index in its own file (.NDX) is that dBASE Plus can automatically update each index tag as needed (as rows are added to the table, as rows get edited or deleted). The older method meant that you had to either update each index file (.NDX) one at a time or open all of them and issue a "REINDEX" which rebuilt the information stored in the index.
In dBASE Plus, the "REINDEX" command actually is only needed to fix broken indexes or in a few other situations. (There is an OODML -- Object Oriented Database Manipulation Language -- method of handling this as well -- see "xBASE to OODML" in the Knowledge base.)
Note: If you are used to creating indexes at the command window (or dot prompt), they can still be done that way. However, this requires you open the table like you used to do (USE tablename EXCL), issue the INDEX ON command, and so on. In addition, if your fieldnames have spaces in them you DO need to use the colons to delimit them as shown below.This is the "old" XDML method which we will not be using in this tutorial, but it still works in dBASE Plus.
Indexing the Customer Table (Using the Designer)
One way to index a table is in the designer. We are going to do just
that for the Customer table and most of the other tables. In a bit we will
look at a different method, but most of the work on indexes will be in
the designer.
To bring a table back into the table designer, the simplest way is to choose "Table," then "Modifiy Table" in the dQuery menu. When the table designer opens, the menu will contain an item named "Structure." This allows you to modify the table structure, and to deal with indexes (at the bottom of the menu). The first thing we are going to do is define the Primary Key for this table, so select the "Define Primary Key ..." menu option.
The dialog that appears should look like:
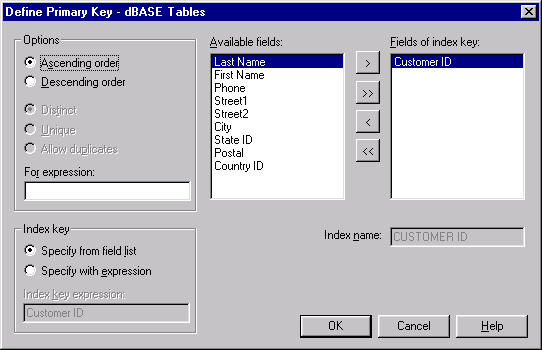
Click on "Customer ID" in the fields list and then the button that looks like: >. This will move that field into the section on the right. Enter the name of the index in the "Index Name:" entryfield ("Customer ID" -- do not enter the quotes). There is nothing else that needs to be set here.
Click the "OK" button.
Now that we did that, what is a Primary Key? The following is from online help:
Primary indexes require unique values -- they do not permit duplicate key values. For example, if a dBASE table has a primary index on ORDER_NO, you cannot add two orders with the same order number -- only one can exist in the table. In a composite index, individual field values can be duplicates, but the combined value of all key fields must be unique. (Secondary indexes do permit duplicate values.)When you create the primary index, use a field that will contain a unique value for each row, such as a customer number field.
A table can have only one blank (empty) value in the keyed field, because subsequent blank values are considered duplicates. Therefore, key fields usually require entries.
While the autoincrement field is by default a unique value, this is a way to ensure that the value is unique (using low-level file functions it is possible to reset the autoincrement value, we won't be getting into that here -- but the problem is that by doing this it might be possible to actually have the autoincrement field generate a duplicate value and, by itself, it does not check for this -- making it a primary key solves this problem and forces it to check for duplicates).
Now that we have created the primary key (there can be only one of these for a table), we need to create the other indexes that we will use in our table. The indexes for the Customer table will be done with the other menu option under the "Structure" menu, "Manage Indexes ...".
Once you select this, you will see a screen like:
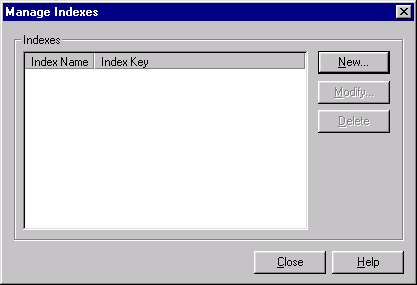
Click on the "New ..." button, and you will see a dialog very much like you did for the Primary Key. However, we are not creating a primary key but a "secondary index".
For the first "secondary" index, we will use this dialog. We will index on the "Last Name" field. To do this make sure that in the lower left corner the radiobutton that says "Specify from Field List" is selected. Click on the "Last Name" field in the list of fieldnames, click on the pushbutton that shows >, and the field will appear on the right. Enter "Last Name" as the index name in the entryfield provided ("Index Name:"), and click "OK".
That was a lot of work for a simple index, wasn't it? Would you believe it's easier? Once you clicked "OK" in the dialog above, you were put back at the "Manage Indexes" screen. Click the "Close" button, and in the Table Designer for this table note that the last column is "Index". For most of the fields shown, it should say "None". In the case of the "Customer ID" and "Last Name" fields, you should see "Ascend".
Click on the "Country ID" field and go over to the Index column. In the drop down list select "Ascend" (the normal sequence for an index) or type the letter "A". When you tab off that field, you will have specified that an index tag will be created called "Country ID", and it will be ascending for that field. This is much easier than using the dialog shown above.
Do the same for the "Postal" and "State ID" fields. This will give you four secondary index tags, and the primary key.
We can also create a "complex" or "expression" index tag, which in the table designer requires that we use the "Manage Indexes" dialog. So, go back to the "Structure" menu, and select "Manage Indexes ..." and then click the "New" button.
In the dialog select the radio button in the lower left corner that says "Specify with expression", and in the entryfield under that, enter:
left( upper( trim(:last name:) + "," + :first name: ) + space(40), 40)
The colons in the expression above indicate to dBASE Plus that the text between the two colons is to be considered as one word, in this case a field name. Otherwise, the space between the two words would be parsed as a "delimiter" and the trim function would not know how to handle the two words and would generate a syntax error message. We are combining the last and first names, which can be useful for some search scenarios, and making sure that the data is indexed on the "upper case" version of the data.
The use of the upper case function makes the index expression "case insensitive" as long as we set our search properly (including using a "seeker" control in our forms, which we will be doing for nearly all of them).
Note: There's more going on as well. What we are doing with the use of the left() function combined with the space() function is avoiding what are called "variable length" index tags -- i.e., ones where the length of each element contained in the tag may be a different length. Using these can really confuse dBASE (and the BDE) and cause unreliable index tags. We are trimming the last name, adding a comma between it and the first name. The problem is that trimming the last name removes the spaces that are normally used to pad the field out. If we then add 40 spaces (total length of both fields), and then use just the left 40 characters, we are really simply ensuring that the index expression is 40 characters, and that we have both names with any padding of spaces to fill it out to a total of 40 characters.The comma is in the expression to make lookups more intuitive -- a user is more likely to type "Mayer,Ken" than "MayerKen" in a "seeker" control (details on that later).
Call this index expression "Names" (you must specify this in the dialog in the "Index Name" entry, otherwise the designer will create a default index name that you cannot change without deleting the index tag and starting over), and click "OK" (this will close the "Define Index" screen), and then click the "Close" button (this will close the "Manage Indexes" dialog). Note that this index does not appear in the table screen in the index column. No expression index will appear there, including an expression that simply includes the use of the upper() function.
Now that we are done with this table, save and exit the table designer (<Ctrl>+W).
Note: At this point you may notice a table called "Backup of Customer.dbf" in Navigator's Tables window. Any time you modify the structure of a table, dBASE Plus makes a backup copy of the original table and names it "Backup of WhateverTable.dbf".You can use Windows Explorer to delete these backup tables.
Creating Indexes Using dQuery
You can create indexes for dBASE tables using dQuery. We are going to create
two index tags using this feature, just so you can see how it works.
We are going to create an index on the "Supplier ID" field of the Inventory table.
Select the Inventory1 query object (i.e. listbox) on the dQuery design surface. Then, in the menu, choose "Tables" | "Indexes (Keys)...." The Set Index (key) dialog will appear. The index list is empty, but the "Add" button at the bottom is active. Click that button to create a new index.
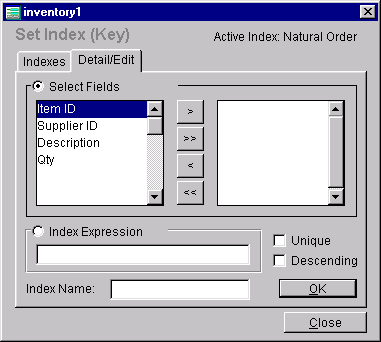
The functionality of this dialog is similar to that of the table designer. Click on the "Supplier ID" field in the list of field names. Then move that field to the right side listbox by clicking the button that shows >. Enter "Supplier ID" in the Index Name entryfield and click OK.
The second index is going to be on the description field. Click the Add button again. This time we are going to use an "Index Expression." Click the radiobutton and type "upper(description)" in the entryfield. Name this index "Description," and then click the OK button.
The Inventory table now has two secondary indexes. The Supplier ID is based on a selected field while the Description is based on an expression.
The Inventory table also needs a primary index key. However, there does not appear to be a way to create one on a .DBF without using the table designer. This means going back and setting the "Item ID" in the same fashion as was done for the Customer table. (Go back and follow the directions for the Customer table's primary key, but do it for the Inventory table).
The Other Tables In the Application
For the other tables, bring each up in the designer, and set indexes for the
following fields -- where they say "Primary", make sure you do it using the
"Structure" menu, and the "Define Primary Key ..." dialog, for the expression
indexes, use that aspect of the index designer ("Manage Indexes ..." and so
on, as we did with the NAMES index above), and when done save and exit with
<Ctrl>+W). Note that the name for each index is the field name (in
the first column), and all indexes we are creating are ascending (Ascend):
Country table:
Name Type Expression Country ID Primary Country Expression upper( Country )
Invoice table:
Name Type Expression Invoice ID Primary Customer ID Secondary Order Date Secondary Pay Type Secondary
LineItem table (no primary key):
Name Type Expression Invoice ID Secondary Item ID Secondary Qty Secondary InvoiceItem Expression str( :invoice id:, 7 ) + str( :item id:, 7 )
This last index for this table will be necessary when we get to working with the forms for this application -- we will be using it to find a line item in the table, but it will need to be a specific line item for a specific invoice (which is why the invoice id comes before the item id in this expression).
State table:
Name Type Expression State ID Primary State Expression upper( State )
Supplier table:
Name Type Expression Supplier ID Primary Contact Expression upper( Contact ) Company Expression upper( Company ) State ID Secondary Postal Secondary Country ID Secondary
At this point, the one thing missing is data in the tables. It is hard to design an application without data, even if it is just "test" data.
Note: If you are using an oriental version of dBASE Plus, see the note at the beginning of this document under the section titled "Actually Creating the Tables". This is very important.
We could sit down and randomly generate data, either by typing in miscellaneous things, or using the "GENERATE" command, but these don't give us anything meaningful to look at while designing the system (and the tables that rely on links between them will be less than useful). We could also sit down and try to create meaningful data.
To expedite this process, the tutorial project includes sample data that we can append into the tables you have created. To do this you will use the "CopyData.prg" program that comes with the tutorial files. This file should already be in the dBASEtutorial\Tables folder (wherever that is on your system). The data is in a set of hidden dbf files, which are also in the Tables folder.
The program will use a combination of OODML objects and XDML commands to copy the data from the hidden tables into the tables you just created. If, for any reason, you need to re-populate your tutorial tables, simply rerun CopyData.prg. You can examine the code in the program by opening it in the source editor.
Close dQuery to use the program (don't just minimize it). Then locate the Navigator and click the "Programs" tab. (If the Navigator is not active, select the "View" menu, and then click "Navigator." If it's still not visible, try the "Window"->"Cascade" menu item.) In the Navigator's "Look in" combobox, type the path to the Tables folder (C:\dBASEtutorial\Tables) and press <Enter>. This will change the working folder and premit you to browse the files it contains.
You should see the CopyData program file in the listview. Double-click that file to run it. This program will move the data from the hidden tables to the tables you created above.
When done, change the working directory back to the dBASEtutorial folder (Type:C:\dBASEtutorial\ in the Look in combobox and press <Enter>).
Last Modified: November 11, 2002
The Legal Stuff: This document is part of the dBASE Plus Tutorial created by Ken Mayer and Michael Nuwer. This material is copyright © 2002, by Ken Mayer and Michael Nuwer. dBASE Plus is copyrighted, trademarked, etc., by dBASE, Inc., the BDE (Borland Database Engine) and BDE Administrator are copyrighted, trademarked and all that by Borland, International. This document may not be posted elsewhere without the explicit permission of the authors, who retains all rights to the document.